Practical Tips
Dried blood spots
Providing dried blood spots for Phenylalanine (phe) monitoring is essential in PKU, as this enables your dietitian to check your phe levels are within a target range and make any amendments needed to your diet. Your dietitian will advise you on how often blood spots need to be provided for testing.
It is important that you become used to providing good quality blood spots. If poor quality blood spots are received at the lab, they may not be accepted.
What are blood spot samples?
Blood spot samples are a drop of blood, about a centimetre in width, that are placed onto a specially made testing card.
This testing card takes 4 blood spot samples and is sent back to a lab where the phe level in the blood is tested.
How do I complete a blood spot card?
Before taking the blood spot sample, check the date on the testing card to make sure it has not expired and that all sections are completed.
These cards may already have a label on them with all your details (it’s still always useful to double check these are correct).
If not, you will need to add them to the card.
Providing a good quality blood spot sample
You will have completed a blood spot sample hundreds of times in your life but just in case you need a refresher on how to do it, here is a step-by-step guide to providing a good quality blood spot sample:
- Wash your hands
- Prick your finger
- Allow a drop of blood to form
- Place the blood spot card up to the drop and allow it to drip onto the circle on the card, as close to the centre as possible. Do not press your finger against the card.
- Repeat step 4 onto the other 3 circles on the blood spot card.
- Once you have finished, cover the prick site with a little cotton wool and light pressure – bleeding should stop almost immediately.
- Allow the blood spots to absorb into the card and air dry enough so they lose the initial wet look before putting the card into the envelope provided (if they are not air dry then they can stick to the inside and damage the card).
- Send the blood spot sample card back to the hospital as soon as possible once you have completed it. This helps to make sure any changes to your diet can be identified quickly by your dietitian.
Important points to remember:
- Have all the equipment ready before you start.
- Always take the blood spot sample at the time of day your dietitian has advised but it is usually best to measure early in the morning before the first meal of the day.
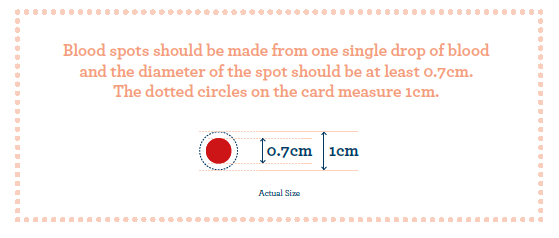
- Blood spots need to be taken from just 1 drop of blood, measuring 0.7mm – this is just under a centimeter in diameter.
- If blood spots don’t meet this measurement and are taken from more than one drop of blood (overlapping on the card) the phe level result will not be accurate and will need to be repeated.
- Blood needs to be soaked right through the card so the lab can test it properly.
- If you have any questions at all about this process, contact your dietitian or the metabolic nurse at your hospital.
Top Tips
- Keep your finger below the level of your heart to encourage blood flow.
- Make sure there is a collection from your post box on the day you post your results.
When you have PKU it is particularly important to know how to read food labels.
This will enable you to check the protein content of foods and work out if the food is suitable for your diet without counting it as a phe exchange.
If you are not used to doing this, this might seem confusing and overwhelming at first, but with practice this should become easier.
As a reminder, the protein in food is counted as phe exchanges. 1 phe exchange is the amount of food that provides 1g of protein.
1g of protein = 50mg of phe
So, 50mg of phe = 1 phe exchange
Most pre-packed foods have nutritional information on the back or side of the packaging.
Here is an example of the nutritional information on a Weetabix cereal packet:
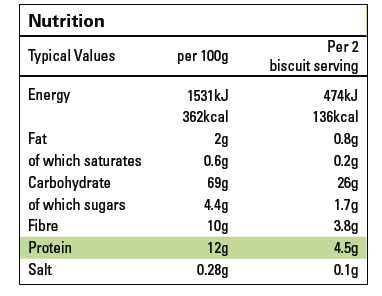
This label provides information on energy content expressed as kilojoules (kJ) and calories (kcal). Information is also provided on the typical fat, carbohydrate and most importantly for PKU, protein content. All nutrition information is provided per 100 grams and sometimes per portion of the food. So, in this instance 2 biscuits of Weetabix contain 4.5g of protein.
How to read food labels
Unless a food is a specially manufactured low protein food, then it is extremely unlikely that the phe content will be provided on a food label.
Sometimes food labels will state that the product contains protein. However, the ingredients list may be made up of foods which you know are exchange free. If this is the case, the food can be eaten without contributing towards phe exchanges.
However, the phe content can be estimated from the protein content. From this, the number of phe exchanges in a certain quantity of food can be calculated.
To work out if a food needs to be counted as a phe exchange look at the protein content on the label. If the protein is 0.5g or less per 100g, then this food is classed as exchange free (please note, this does not apply to plant-based alternatives to milk, please speak to your dietitian about this). However, if it is over 0.5g per 100g, then you will need to calculate how much of that food is a phe exchange. Your dietitian will tell you how many phe exchanges are allowed each day.
The National Society of Phenylketonuria (NSPKU) dietary information booklet provides a comprehensive list of products which are exchange free. For further information, visit www.NSPKU.org.
Calculating phe exchanges
When you know the protein content of a food per 100g, you can calculate how much of that food equals 1 phe exchange.
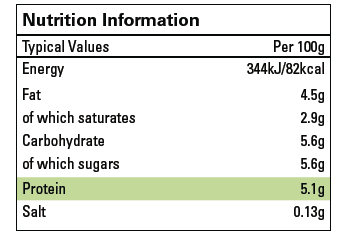
For example, this yoghurt contains:

5.1g of protein per 100g. So, 100 ÷ 5.1 = 20g.
Therefore, 20g is equal to 1 phe exchange.
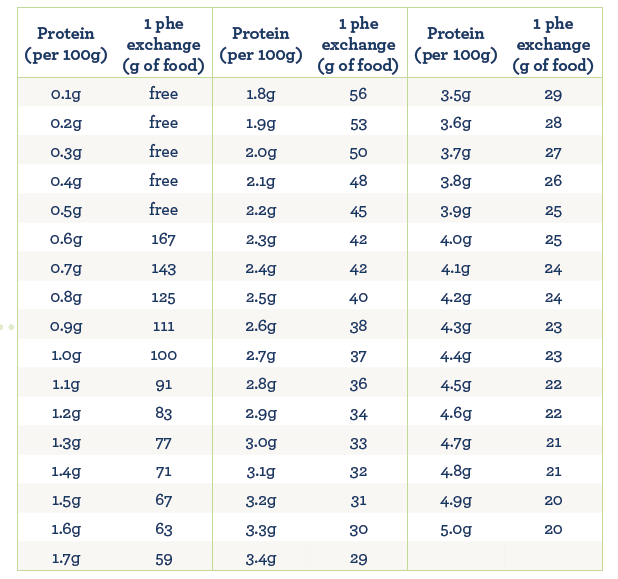
When you need to calculate phe exchanges quickly, print off and use the ready reckoner below.
For example, if the protein content on the label states 0.9g per 100g, then 111g of this food is counted as 1 phe exchange.
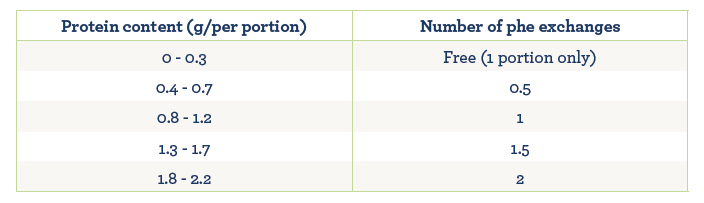
Phe exchanges per portion of food
Usually, it will say on the label how much protein there is in 1 portion. The table below shows how many phe exchanges are in a portion of food based on the protein content.
If a portion of food contains 0.3g protein or less, it is exchange-free for 1 portion. However, if you eat more than 1 portion it will need to be counted towards your daily exchange allowance as advised by your dietitian.
If you do not have the protein content per portion available, then you can still work out the number of exchanges per portion of food using the steps below:
- Multiply the protein content of food per 100g by the amount of the food eaten.
- Divide this number by 100 to give the number of phe exchanges per portion of food.
If you eat 10g of yoghurt: 5.1 (protein per 100g) x 20 (amount eaten) ÷ 100 = 1 phe exchange
Remember practice makes perfect and will increase your confidence in working out what you can incorporate into your low protein diet.
We recommend you regularly refer to the NSPKU dietary information booklet on their website for the most up-to-date nutritional information.
As your independence grows and you start to gain confidence in the kitchen, you may start to increase variety in your meals. Specially manufactured low protein foods will become staples of your diet, if they aren’t already, and act as a great base to build a meal around. Here are a few helpful hints and tips for cooking with specially manufactured low protein foods: